We’ve been working on upgrading our stats report email that sends out every week detailing key statistics of how that client’s marketing is going. My plan is to have a very robust email detailing key metrics for all the major areas we focus on, including SEO, social media, blogging, email marketing, online ads and more.
To do that I’ve been patching together lots of APIs and database connects to consolidate all the information into this one email. One of those stats I want to display is the client’s Facebook Page views using the insights’ metric page_impressions from the Facebook Graph API.
To do that and allow my weekly email app to run based on a cron job (so it can automatically send out), I needed to get a never expiring access token for this. This took me quite a while to figure out due to the lack of detailed explanation on Facebook’s docs and other places I’d reviewed online. So here is how to get a never expiring Facebook Page Access Token.
Very first thing you need to do is make sure you are an admin/manager of the Facebook page you want a get a never expiring token for. Without that you’re not getting anywhere.
[For an updated 2018 version, click here]
[For an updated 2016 version, click here]
How to get a never expiring Facebook Page Access Token:
- Created a Facebook APP or used one I already created.
- Wrote down that Facebook APP’s Id and Application Secret.
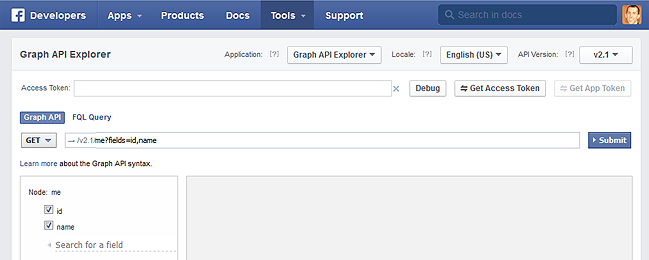
- Got a Short-Lived Access Token from the Facebook Graph API Explorer. Facebook Graph API Explorer can be found here https://developers.facebook.com/tools/explorer
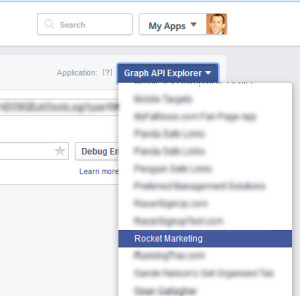
- First selected my app as the Application dropdown.
- Then clicked Get Access Token button.
- When popup opened, I clicked on Extended Permissions and checked boxes for manage_pages, read_insights and read_stream.
- Then click Get Access Token on popup window.
- This gave me an Access Token in the Access Token box. I copied that down. And tested it with the Facebook Access Token Debugger https://developers.facebook.com/tools/debug/accesstoken just to see if it was a token that would expire and it should expire in less than 1 hour. I didn’t need to test this but wanted to just to see what it would say.
- Then I took that Access Token, the APP’s Id and Application Secret and plugged those into this URL
https://graph.facebook.com/oauth/access_token?client_id=APP_ID_HERE&client_secret=APP_SECRET_HERE&grant_type=fb_exchange_token&fb_exchange_token=ACCESS_TOKEN_HERE - That URL gave me a Long-Lived Access Token. This expires in 60 days. I tested it to see that using the Facebook Access Token Debugger. Now I tested this Access Token with the Facebook Access Token Debugger and got back that it expires in 2 months (60 days).
- Now to get the never expiring Page Access Token, I went to Facebook Graph API Explorer and plugged in that Long-Lived Access Token we just created which expires in 2 months. I pasted this into the Access Token box. Then entered into the Get input box “MY_FACEBOOK_USER_ID/accounts” (without quotes). If you don’t know what your Facebook ID is you can get it here http://findmyfacebookid.com/.
- Then I clicked the Submit button on the Facebook Graph API Explorer page. Although when I did that I got back an error. So I put back into the Get input box what was their originally to see if I could get my id. I put this back in “me?fields=id,name” (no quotes).
- I got back an id number and my name in the results.
- I took that id and plug it into the GET input box “MY_FACEBOOK_USER_ID/accounts” (without quotes). Now I got back a list of pages I manage. Along with an Access Token for each page. This Access Token should be a never expiring token.
- To confirm these were never expiring tokens I tested them with the Facebook Access Token Debugger and got back they never expire.
Updated 2016 Version:
This only works for existing apps. So if you have not created your app yet or don’t have an app, then create one.
- Go to https://developers.facebook.com/tools/explorer
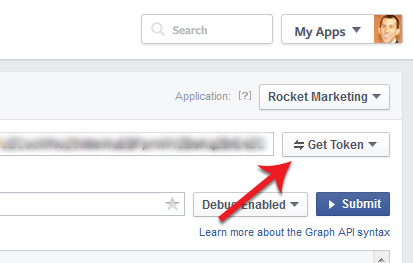
- Select your applications from the dropdown on the top right hand side
- Click “Get Access Token” button just below the application drodown on the right hand side

- In the dropdown select the page you want to get a access token for. If you don’t see your pages listed then you’ll need to make sure you’re set with the admin role for the page. Also you may have to click “Get Page Access Token” in the dropdown, after which then your pages will show in the dropdown next time you click the “Get Access Token” button.
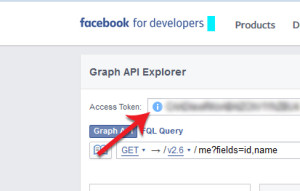
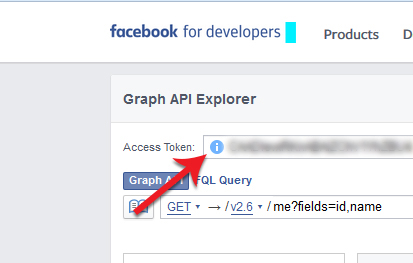
- In the “Access token” input field click the blue exclamation point icon
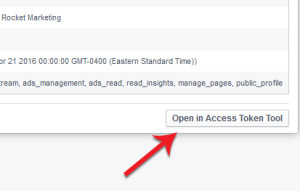
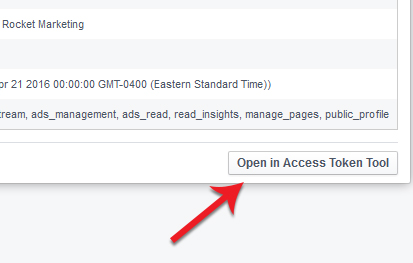
- In the popup click the “Open in Access Token Tool” button on the bottom left of the popup
- This will open a new page with that app’s access token details. You’ll most likely see the token only lasts for an hour or so
- To extend that token and get one that doesn’t expire, click the “Extend Access Token” button
- That will give you a never expiring access token

Updated 2018 Version:
To get this to work first you have to follow all the step in the 2016 instructions above, click here. Then come back and follow the instructions below.
- After following 2016 version you should have a token that lasts for 60 days.
- Go back to Graph API Explorer, paste in the token in the “Access Token” field.
- Under that field paste in “me/subscribed_apps” (no quotes) and make sure it’s set to POST.
- Click Submit.
- Now back up in the “Access Token” field, click the blue circle exclamation point icon.
- Click button “Open in Access Token Tool”.
- At bottom right of page click the “Extend Access Token”. It should now make that token a never expiring token.


Thanks for this
Thank you Visi! What’s funny is that I refer back to it so often myself that I’m so thankful I put it together!
vlla a munesh pak me ma spjegu per kta tokenat qe i marrim me publish_action dmth mos me skadu kurr apo e kam keqkuptu flm shum mundesisht nese e sheh kete reply kthema ne elsharawy023@gmail.com Flm shum
Now that Facebooks needs to review every app with manage_pages and read_insights permission, does your method way still works? Have you found any way to get around the review app-thing?
Does anyone found a solution for this problem?
It’s still working for me. What are you experiencing on your end?
It still works for existing apps that already have the manage_pages permission. It’s new apps that are the problem, you have to put the app through an approval process – providing screenshots and a lot of other information… Such a pain if all you’re intending is to pull your posts onto your site.
I see… I’ll have to check into that. If there is anything I can find that would make the process faster and easier, I’ll post it as an update here.
Nice one thank you. P.s. I used this tutorial a few times before the change and it worked perfectly.
Happy to hear that! I’ll check into this for new apps.
James, for existing apps, I’ve also found the process has changed a little. I’ll be updating my post with details on how to do this and how to do it with a new app (I’ll find the easiest and fastest route and post it).
Now for existing apps:
1. Go to https://developers.facebook.com/tools/explorer
2. Select your applications from the dropdown on the top right hand side
3. Click “Get Access Token” button just below the application drodown on the right hand side
4. In the dropdown select your application again
5. In the “Access token” input field click the blue exclamation point icon
6. In the popup click the “Open in Access Token Tool” button on the bottom left of the popup
7. This will open a new page with that app’s access token details. You’ll most likely see the token only lasts for an hour or so
8. To extend that token and get one that doesn’t expire, click the “Extend Access Token” button
9. That will give you a never expiring access token
And there you go!!
It’s still working for me as of a week or two ago. Have you tried it on your end?
God bless you!!
This article was SOOO much more useful than the facebook docs. You must have an IQ of 160!
You’re welcome Mark! Very happy to hear it’s helpful. I’m always surprised things like this are so complicated and not well thought out in the first placed. But at any rate, let me know if I can be of any other help.
that was really helpful -thanks
Welcome!
Sorry after 2 months can I get back my tokens THNAKS a LOT..
You can generate new ones.
Thanks for reply can you tell me how Thanks
Try this… It’s an updated version of what to do:
Now for existing apps:
1. Go to https://developers.facebook.com/tools/explorer
2. Select your applications from the dropdown on the top right hand side
3. Click “Get Access Token” button just below the application drodown on the right hand side
4. In the dropdown select your application again
5. In the “Access token” input field click the blue exclamation point icon
6. In the popup click the “Open in Access Token Tool” button on the bottom left of the popup
7. This will open a new page with that app’s access token details. You’ll most likely see the token only lasts for an hour or so
8. To extend that token and get one that doesn’t expire, click the “Extend Access Token” button
9. That will give you a never expiring access token
Hello Sean.
Thank you for your perfect tutorial. I don’t now if I do something wrong but button “Extend Access Token” generate me only 2-month token, not never expiring.
Getting the same thing here – my token is valid for 2 months, not “never expiring”.
Same issue 2 months
Try what I mentioned to @cstanard:disqus above.
Check and make sure you’re selecting an app in step 2. Or could be some sort of difference in the settings of the app. Make sure the app is public (live and able to be used), an “App for Pages.”
It doesn’t look like you’re using an app. I’m not familiar with the Czech language but I don’t have “Profil ID”, which I believe means “Profile ID.” Sounds like you’re not using an app (make sure to select an app in step 2, and make sure the app is all setup). As well make sure the app is public (live and able to be used), an “App for Pages.”
Thanks for writing this up, very necessary! I think this misses the redeem step of the documentation though, I am also getting an expiration date of 2 months. See https://developers.facebook.com/docs/facebook-login/access-tokens/expiration-and-extension -> maybe you need to add the steps of section “Generating Long-Lived User Tokens from Server-Side Long-Lived Tokens” ? Cheers
and thanks for mentioning the BUI button, I made a whole script to do it (which was useful anyways to do redeeming in case of multiple clients, and as learning exercise), but it turned out the go to debug link + extend button was all there was to it haha
Hi
I have tried I am not able to get the never expiring token? Also with the token expiring in 2 months I am not getting pages list, API call me/accounts not getting any data, I also have tries MY_USER_ID/accounts and that is also getting no data, can you please help me why this is happening?
That’s very strange. Are you selecting an applications in step 2? Only way I can think of right now is that you’re not selecting the app or when your making the me/accounts call you’re not using that same app again to make the call. Check those and let me know how it goes.
The same way as already described in the article:
1) Go to Graph API explorer
2) In the combobox Application, select your application you have created before
3) In the Get Token combobox, select Get User Access Token and possibly check additional permissions you want to attach to the token (for example read_insights). Then click Get Access Token.
4) Copy the generated token to the Access Token Debugger and click “Extend Access Token”.
Fantastic! literally nothing I could find explained this properly, not even the actual docs. Thank you.
You’re welcome. Happy to hear it help!
Thanks!
This works like a charm, fits like a glove!… for years, months, i’ve been struggling on this access token issue. this article is just flawless, idiot proof, and far more better than Facebook docs! thanks!…
Glad to hear!
Sean thanks for the article, it saved me a lot of time. Just two remarks:
1) in point 3.2, I had to get “User Access Token”, not “App Token”. This might be due to the fact that my App didn’t have the read_insights permission.
2) the steps 5-7 are no longer necessary – you can get everlasting token from the short one just by clicking “Extend Access Token” at the bottom of the Access Token Debugger.
Hi Peter, your right FB has made some changes since I originally posted this. But I’ve just updated the post to include a new tutorial on how to do this (see the updated version at the bottom of my post).
This article saved my day!
Happy to hear!
Hi, Thanks for putting up such a nice tutorial. I tried the same and found out we can query the results using this long lived token only in the graph explorer not outside. Or am i missing something ?
Yes, you should be able to query outside the graph explorer with this token. I’m doing that myself. So should work for you.
Thanks for this great post. Unfortunately it’s not working for me. In step 3 I can’t select the “read_stream” permission. It’s just not available. Do I need to configure something on the app to have this permission available?
The step 3 has I mistake, or FB changed things since the article was published. You have to click “Get User Access Token” and then it works.
Yes, FB changed some things since I originally posted this. I’ve update my post to include a new tutorial on how to do this (see the updated version at the bottom of my post).
See my newly posted updated version at the bottom of my post on how to get through that.
Hi i tried everything but my array after the 11th point is empty
I get this:
{
“data”: [
]
}
But if i change accounts for albums, for example. i get an array like this:
{
“data”: [
{
“created_time”: “2010-07-10T17:14:30+0000”,
“name”: “Mobile Uploads”,
“id”: “1376084320412”
},
{
…
…
…
Any help, please?
Thanks
@crismontse:disqus
I am also getting the same thing, anyone can help?
Hi i tried everything but my array after the 11th point is empty
I get this:
{
“data”: [
]
}
But if i change accounts for albums, for example. i get an array like this:
{
“data”: [
{
“created_time”: “2010-07-10T17:14:30+0000”,
“name”: “Mobile Uploads”,
“id”: “1376084320412”
},
{
…
…
…
Any help, please?
Thanks
Sure, I’ve made an updated tutorial on how to do this. Check it out at the bottom of my original post. That will help you through this, plus it’s much easier to do now.
Hi i tried everything but my array after the 11th point is empty
I get this:
{
“data”: [
]
}
Any help, please?
Thanks
Hi! See my newly updated version of how to do this (that I just posted). It’s at the bottom of my post.
Wow, thanks! It worked like a charm. Only when i pressed the “Extend Access Token” button in the last step, the token expiring time was set to 60 days.. The button is not clickable now.
Anyone else with the same problem?
Check and make sure you’re selecting an app in step 2. Or it could be some sort of difference in the settings of my app verse what you have. Make sure the app is public (live and able to be used, you should have the green dot next to your app’s name in the app developer dashboard), and make sure it’s an “App for Pages.”
Hi. Are there anyway to get my friends facebook token? Thanks.
If you’re trying to post to their profile, or view their profile data, then yes. You would need to send them to a page to authorize your app to access their page/profile. Then your app could make calls to their profile.
This is only gives me an extended token, which expires in 2 months.
Yes, this is a mystery I haven’t seen answered yet. Some people get 2 months token, some get never expiring. I am in the second camp, but don’t know why.
I’ve seen a few people having this issue. I think it might be related to the app they selected in selected in step 2. Make sure the app is public (live and able to be used, you should have the green dot next to your app’s name in the app developer dashboard), and make sure it’s an “App for Pages.”
Have a few applications with pretty much same settings, for some of them it gives 2 months token for some of them never expired. All of them have App for Pages and all of them are published. So should be something else
The complete solution is explained here: https://developers.facebook.com/docs/marketing-api/authentication
Thanks!, but when i plugged my id and secret into this website {https://graph.facebook.com/oauth/access_token?client_id=APP_ID_HERE&client_secret=APP_SECRET_HERE&grant_type=fb_exchange_token&fb_exchange_token=ACCESS_TOKEN_HE} this window pops up, does any one know why?
You didn’t enter in your app’s id and/or client secret and/or fb_exchange_token correctly in the URL.
I use this method more than 3 times and every time its written “Expires: never” and after a month the token stops working :/
That’s strange… are you going back and trying to make a new token during that month? Maybe you’re destroying or overwriting the access for your token.
Facebook change the extend feature its only 3 month extension not “Never Expired” as you mentioned in your tuts kindly update it; any ways thanks for the great tutorial. It’s help me a lot.
Try to read “Via Graph API Explorer” section here: https://developers.facebook.com/docs/marketing-api/authentication
Thank you so much. I was pulling my hair out, trying to figure this out using FB documentation…
FWIW, after completing the “Updated 2016 Version” procedure, I was given an “extended” access token that expired in 60 days – not a non-expiring one, as I was told I would receive in step 9. I then did steps 7-11 above from the original version, and finally got a non-expiring token.
Thanks for this great post. It works like bullet without wasting of time.
How can i update this when i changed my user passw. I had a issue with expired token and redid everything. Now the app keeps giving me a error about a changed password
The best way to have a non-expire token is following “Via Graph API Explorer” section you find in this doc: https://developers.facebook.com/docs/marketing-api/authentication
Hope can help someone.
Thank you! Article helpful
In version 2016, even you click extend access token in Access Token Tool, you only have 60-day access token, no more.
https://developers.facebook.com/docs/marketing-api/authentication
8. To extend that token and get one that doesn’t expire, click the “Extend Access Token” button
9. That will give you a never expiring access token
Following all the steps but there is NO “Extend Access Token” button ???